The Basic Website
Basic Site-Part B
revised: 25-Apr-2023
Perquisites:
- Basic Server (Ubuntu 22.04 64bit) with Webmin linked to a domain-name: such as example.com.
- Installed Firewall.
- Installed FTP server
- Installed iRedmail (includes Nginx Webserver)
- Basic Site-Part A, completed.
Assumption: that one wishes to have in future a mail contact form integrated the basic web page, then one will setup with Nginx to link up with iRedmail. As iRedmail chooses the Nginx Webserver, the first section (Part B.1) explains the configuration of a website on Nginx. While the second (Part B.2) explains the same but choosing instead the Apache Webserver.
Part B.1: Hosting the Website on a server with iRedmail and the Nginx Webserver
For Hosting the Website on a server with the Apache Webserver -- see page B2
Reference: Multiple-Sites on NginxStep01: (Assuming Nginx is installed) Create a website directory, in the name of the domain eg example.com in a user's home directory, eg /home/sammy. Logon via PuTTY, with the regular user. The user first needs to be part of the group of the webserver, that is: www-data
In the index.html file, 'Copy & Paste' the following:<html> It works!</html> Then Ctl+s to save and Ctl+x to exit.
Step02: Create a link to the webpage directory by continuing with this command:
Step03: Enter Webmin [https://example.com]:10000] and go to [Servers]-> [Nginx Webserver]* and make changes to the following three configuration files; nginx.conf, 00-default-ssl.conf and 00-default.conf :
Change the configuration files with those lines in BOLD.
a. Nginx.conf (Click on 'Global Configuration' to access it and in the http section, make two changes.)
...
http {
access_log /var/log/nginx/access.log;
server_names_hash_bucket_size 64;
include /etc/nginx/conf-enabled/*.conf;
include /etc/nginx/sites-enabled/*;
}
Step04: Create, via [Create Virtual Host], for each domain which is to host a typical website [port:80] by doing the following:
- click on 'Create Virtual Host'
- In the top dialogue box labelled 'Server Name': Enter 'example.com'
- Paste the template contents (see below) into 'Config' section.
- Change: server_name_; to one's domain: eg. server_name myexample.com www.myexample.com;
- Change the root as per one's domain: eg. root /var/www/example.com;
Use the following template:
d. example.com
Step05: Confirmation of Success:
Entering one's domain (eg. example.com) in the browser, the response should be "It works!". Now to manage the website go to BasicSite-Extras.
For PHP-website, see the first steps with Wordpress setup
Part B.2: Hosting the Website on a server with the Apache Webserver
Reference:
Step#1
Enter Webmin [https://example.com]:10000], go to [Unused Modules]-> [Apache2 Webserver] and click on 'install'
Step#2: Enter Webmin [https://example.com]:10000], click on[Refresh Modules] and go to [Servers]-> [Apache Webserver]-> [Create virtual host] and enter the following:
*Note: If Apache2 Webserver module doesn't appear, click on "Refresh Modules".
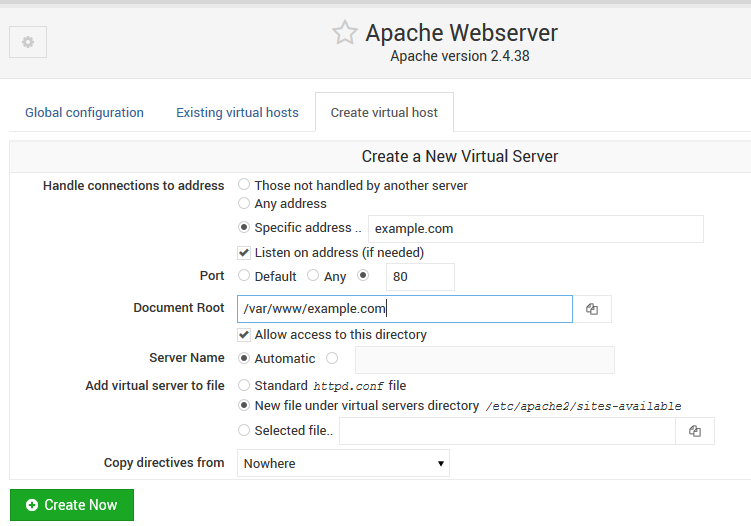
- For the port: Enter '80' and activate the left-side button.
- For Document Root: Enter '/var/www/example.com'
- For Address: Enter 'Example.com' and activate the left-side button.
- Click on 'Create Now' and return to the same virtual server (eg. Address: Example.com)
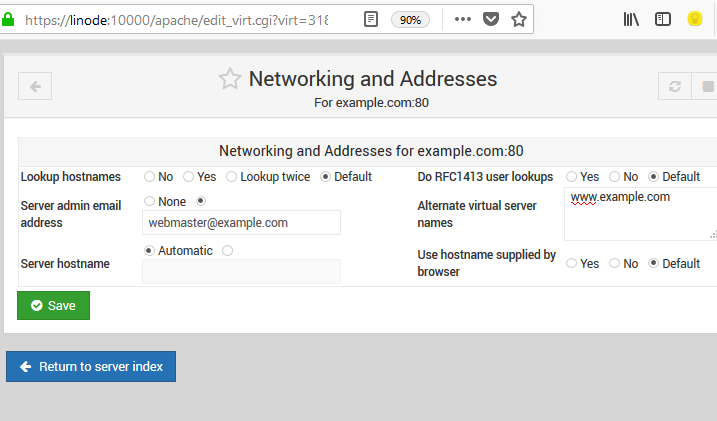
- From the above list of icons, click on 'Networking and Addresses'
- For Server admin email address: Enter a preferred email eg. webmaster@example.com
- For Alternate virtual server names: Enter 'www.example.com'then save. Go to Step04.
For an Apache PHP-based Website: ensure that the module 'PHP7.3' is active.
To test, replace example.com/index.html with index.php having this content:
Step04: Confirmation of Success:
Entering one's domain (eg. example.com) in the browser, the response should be "Hello World". Now to manage the website go to BasicSite-Extras.
| BasicSite-Home | BasicSite-Part B |
| BasicSite-Backup | BasicSite-Extras |