SQL-Ledger Extras
Greater security and significant tips
revised: 27-Apr-2023
The risk of an Internet hack is steadily increasing. The tips 1 - 7 below are to make the ledger more secure and are highly recommended.
Set a strong password for the user: sql-ledger during the setup of SQL-ledger (via Webmin -> PostgresSQL -> Users). In doing so, the creation of any dataset via admin.pl will require that password (using alphanumeric characters only - no special characters). Should one wish to set this user password later, all earlier datasets need to be backupped and then restored after the password has been put into place.It is possible to create in the domain's DNS settings a new 'A' record for the ledger, eg. ledger.myexample.com, pointing to the IP address associated with this site. One can simplify access on each computer to the server via its IP-address alone. On that record is establish, create in Apache2 a new virtual host associated with this new sub-domain. Include then this sub-domain in the creation of the Let'sEncrypt certificate
As the Apache default webpage gives information about one's system, it best to hide that info and simplify the page as follows:
Via PuTTY, logon on the server with a regular, sudo-enabled user (eg. sammy) and enter the following command:
In the index.html file, write/paste in the following:<html> It works!</html> Then Ctl+s to save, Ctl+x to exit and, via Webmin, restart the webserver.
Via PuTTY, logon on the server with a regular, sudo-enabled user (eg. sammy) and enter the following commands for the Apache webserver:
The above command sequence will have created a self-signed certificate and placed the files in a directory.
To check the expiry date of this certificate:Now to set the Apache Webserver to use SSL, by modifying the default webpage configuration:
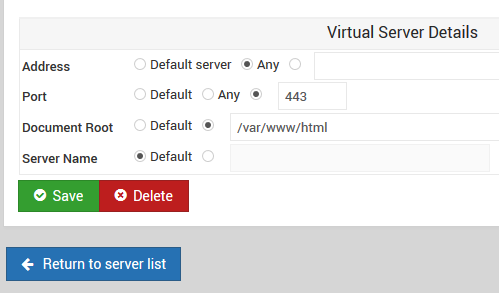
Open Webmin and go to [Servers]->[Apache Webserver]. Create a new virtual host with these settings: Port: enter the number 443 and activate the button on its left-hand side. For document root, enter: /var/www/html and save.
Go to this host's "Edit Directives" and replace/overwrite all the text therein, by 'copy paste', these settings
Click on 'Save and close' then in the top right hand corner, click on the 'Apply changes' button.
In the browser, enter: https://[IP-address] and a warning should pop-up 'Connection is Untrusted'- choose 'I understand the risks'. Often one has to click the 'Refresh' button on the browser to finally enter the site.
Reference: Make Tech Easier - SSL
Similar to the last part of Tip#3, open Webmin and go to [Servers]->[Apache Webserver] and open the virtual host for port:80 then open "Edit Directives", add the following line after the directive: 'DocumentRoot /var/www/html':
Redirect 301 / https://ledger.myexample.com
Open Webmin and go to [Servers]->[Apache Webserver]->[Virtual host-Port:443]->[Edit Directives]. Add these extra lines at the bottom and restart the webserver. Now a pop-up will appear when entering the application - eg.https://ledger.myexample.com- requesting for a username and its password.
Reference: DigitalOcean how-to-set-up-password-authentication-with-apache-on-ubuntu-14-04
In any misdirected requests towards the website, the Apache Webserver gives an error message plus information about the server. Turn off this information banner by entering Webmin: [Servers]->[Apache Webserver]->[Global Configuration]->[Edit Config files] then, at the bottom of the file [/etc/apache2/apache2.conf], add these two lines and save then restart the server:
ServerTokens Prod
ServerSignature Off
The setup for SQL-ledger 3.2.9 can also be used should one wish to install the simpler verion (SQL-ledger v2.8.33)**Enhanced Version by - Armaghan Saqib (ledger123: an enhanced SQL-ledger) The main difference in version 2 is where all users are set in the admin.pl
It is the humble opinion of the writer that the earlier version (SQL-ledger v2.8.33) as described herein is more suitable for small enterprises, like at bookstore.
The SQL-ledger v2.8.33 (Enhanced)can be downloaded (4Mb) HERE
With reference to this source: SQL-Ledger on Nginx but up-dated below.
The setup is very similar to the one for Apache2 describe in the earlier page and its steps are referred to here: Ledger-Home and it is assumed that one has done the following:
- Step01: all the dependencies installed but replacing 'apache2' with 'Nginx' - see Step03 Basic Site-Part B- Step03 to activate Nginx Module for Webmin
- Step02: PostgresSQL Server with user: sql-ledger setup
- Step03:Enhance Nginx with fcgiwrap: sudo apt-get install fcgiwrap
Step04: Upload SQL-ledger and install it
a. Via the Setup Programme
Do the following commands and if successful, jump to Step05:
b. Manual Install
The SQL-ledger v3.2.12 can be downloaded (4Mb) HERE
a. Using FTP (Filezilla), upload the enhanced SQL-ledger application (~4Mb) to the home directory of your regular user (eg.sammy)
b. Using PuTTY, logon as your regular user (eg.sammy)and move the SQL-ledger application to the /usr/local directory then go to that directory:
Decompress the tar file and, after entering the sql-ledger sub-directory, create the spool directory and to spool, users, css and tempates directories. Finally give writing permissions to the sql-ledger sub-directory:Step05: Adapting SQL-ledger to Nginx Webserver
a. Establishing the link, do the following:
| Ledger-Home | Ledger-Extras |
| Ledger-Backup | Ledger-Restore |