SQL-ledger
(by Dieter Simader) Version:3.2.12
revised: 01-Jul-2024
Perquisites:
- Basic Server (Ubuntu 22.04 64bit) with Webmin linked (optionally) to a domain-name: such as example.com. Note: the IP address can simply be used to access the site.
- Installed Firewall.
- Installed FTP server
Step01: Install the supporting software dependencies
Using PuTTY, logon as your regular user (eg.sammy)and 'copy and paste' this one line command (that in italics) below:
The Postfix configuration for this purpose only is required to be "No Configuration". Press the 'tab' then the return key to continue and accept all settings.
Step02: Setup PostgresSQL Server
Login to Webmin in your browser (user:root), click on "Refresh Modules" and go to the PostgreSQL server.
Now go to the PostgreSQL server-> (Icon) PostgreSQL Users:
- a. First click on user: postgres to set a password by activating the "Set to" button and entering a password then save. Then create a new user "sql-ledger" that can create databases (see "Can create new databases? - check "Yes"). Give this user a password. It will be the 'sql-ledgerpassword' for use with the Postgres tools: 'pg_dump' and 'pg_restore'.
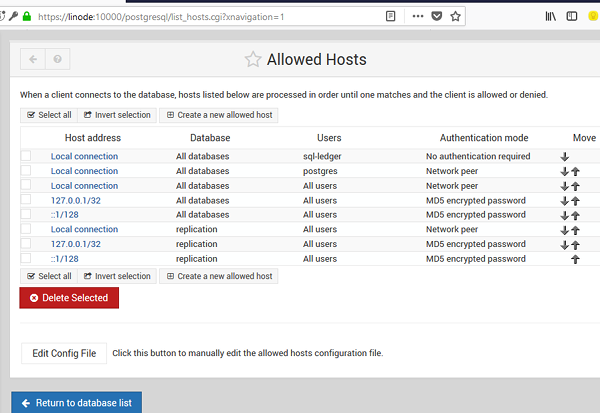
- b. Go to the the tab "Create a New Allowed Hosts". Click to enter and under the section "Host Address", click on the entry called "Local Connection". At "listed users" activate the button beside, type in "sql-ledger". Then set to "No Authentication"
- c. The new setting will be at the bottom of the "Allowed Hosts" list. With the use of the "up-arrow", click several times to move the new setting to the top of the list.
- Note: Alternatively this file is found at /etc/postgresql/11/main/postgresql.conf and, via 'nano' paste this line following that for user 'postgres':
local all sql-ledger trust - d. Restart the PostgresSQL server.

Step03: Setup Apache2
The 'cgi' module needs to be enabled:
Step04: Upload SQL-ledger and install it
a. Via the Setup Programme
Do the following commands and if successful, jump to Step05:
b. Manual Install
The SQL-ledger v3.2.12 can be downloaded (4Mb) HERE
a. Using FTP (Filezilla), upload the enhanced SQL-ledger application (~4Mb) to the home directory of your regular user (eg.sammy)
b. Using PuTTY, logon as your regular user (eg.sammy)and move the SQL-ledger application to the /usr/local directory then go to that directory:
Decompress the tar file and, after entering the sql-ledger sub-directory, create the spool directory and to spool, users, css and tempates directories. Finally give writing permissions to the sql-ledger sub-directory:Step05: Adapting SQL-ledger to Apache Webserver
a. Establishing the link, do the following:
Restart the Apache Webserver (Click on button at top right hand corner which applies the changes)
Step06 Open Sql-Ledger:
a. In your browser, enter: http://[IP-address]/sql-ledger/admin.pl Add a new and strong password (minimum 14 mixed characters/numbers is recommended); this entry is unique, making the owner of the password the Master Controller of all datasets and by using this password, one can create 'datasets' (the app's word for databases)-- simply via "Add Dataset". Note: No extra entries are needed to input here (eg. host, password) if the user:sql-ledger has no password.
b. In the "Create Dataset" dialogue box, type in the dataset name (eg mytest2022db) along with the other inputs.
Thereafter go and click on "continue". This will create the database (eg "mytest2022db") with the default settings (a VAT tax-related British style Chart of Accounts layout). Although, one has the option of choosing a different layout for the Chart of Accounts.
c. Open SQL-Ledger (http://[IP-address]/sql-ledger/login.pl) to login. For the Administator of any dataset, always logins with username: admin@[dataset].
Other Notes:
1. All other users to that database are set by this administator by logging in and establishing other users via the "Employee" section -- and by which setting of particular access rights is done for each new user. If an employee is not to have access, do not enter a login and password for that employee
2. Each enabled new user can then logon as: [login-name]@[dataset]
3. Moreover under 'System -> Audit control', the Administrator can set transactions to be set to enforce the strict reveral process/non-editing of posted entries.
4. Always 'Update' prior to saving an entry or a posting - an important general rule for SQL-Ledger.
| Ledger-Home | Ledger-Extras |
| Ledger-Backup | Ledger-Restore |