SSH Logons
- improved server-security with SSH and other tips
There are constant attempts to hack into any server open to the Internet, chiefly by automated requests by 'bots'. To greatly reduce the success of these attempts, one installs a firewall (to close most ports), Fail2Ban (to restrict repeat attempts to guess a password, and finally SSH which uses another but more secure system than the server's existing user/password pair. The most targetted user is 'root' as it is a well-established username with practically all Unix/Linux servers.
[Tip#01: As Webmin is used to simplify the control of many aspects of the server as suggested in these pages, it is recommended to not apply SSH to the root user but to give it a very strong password of 16 characters or more (See password creation). Should one wish to do so, see Tip:02 below and its reference. However with PuTTY and FileZilla, one is recommended to always logon, using SSH, with a regular user eg. sammy (with sudo capacity) and not with the user: root.]
The security mechanism of SSH is in the use of a pair of keys: public and private. It's useful to visualise the public key as a padlock (the one on the server) that needs the private key (the one that you hold securely on your computer) to gain access to the computer. In addition to the private key, one is also required (if given in the SSH set-up) to enter a passphrase - the term used in SSH for a strong password. Hence SSH provides two levels of security over an encrypted link.
The Steps
Step01: Creating the Public-Private Key set
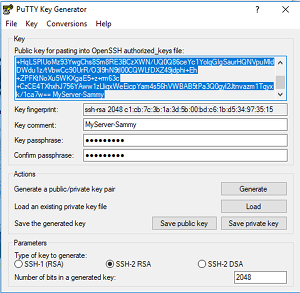
a. Open PuTTYgen: Accepting all the default settings, click on the button:'Generate'
b. Create a folder, then save the private key (.ppk)to the folder.
Note: the .ppk file contains both public and private keys. One can always retrieve the key-pair, using 'load' in PuTTYgen.
Consider encrypting the folder with a strong password to keep this file secure.
Step02: Configuring the server to use a User's SSL logon
Prep: With PuTTYgen, load the .ppk file as to have access to the public key.
a. Logon to the server, using a regular user enabled with 'sudo' functionality -eg. sammy
b. Issue the following commands:
Note: The above instruction will enable the user: sammy to logon via SSH. Should one wish to have 'root' or other users to logon via SSH then the same instructions are to be applied to each of their respective home directories.
Step03: Configuring a User's PC for an SSH logon of the server
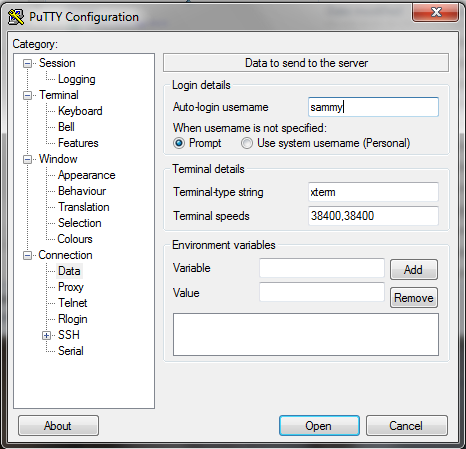
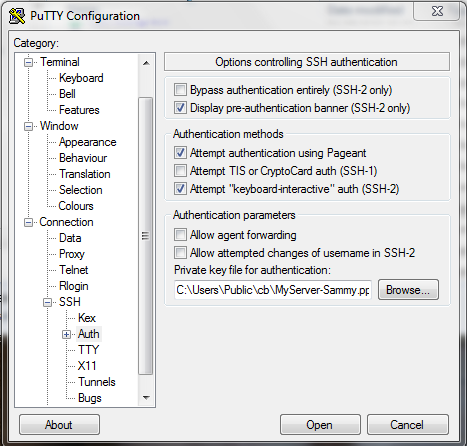
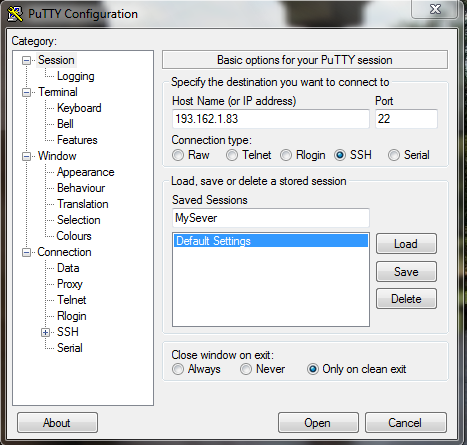
One now needs to configure the PC to use, via PuTTY, the SSH logon, by following these instructions:


Reference: HowtoForge.com - SSH key-based logons with PuTTY
Tip#02: - SSH logons for Webmin
Having successful completed the above, one may consider creating a SSH logon for the user: root and with that process, configure Webmin to accept that kind of logon. See the reference below for details of that configuration.
[Optional] Step04: Set the Server not to allow logons by passwords; only by SSH
Having configured and tested with successful SSH logons, one can consider banning the use of passwords by altering the SSH configuration file:
Tip#03: It's recommended that one reads about sshd_config settings before making changes: DigitalOcean - Tuning your server's SSH configuration
Tip#04: It's recommended to not to change the setting:[PermitRootLogin yes] for reasons of allowing 'root' to login via the Webmin Control panel. SSH settings can also be done in Webmin; see [servers]->[SSH server]. Note: In [Authentication], kept the [User authorized keys file] at its default setting (~/.ssh/authorized_keys)
Reference: Webmin.com - Setup a SSH login for Webmin
PasswordAuthentication yes -> PasswordAuthentication no Note:Login by users only by SSH
PermitRootLogin yes -> PermitRootLogin prohibit-password Note: Logon only by SSH for user: root
To activate the changes, restart the SSH service.
