Scan and Convert Image to Vector-based (.svg)
References:how-to-vectorize-in-inkscape
When scanning particularly a drawing, it may be useful to convert the pixel-based image to one that is vector-based, for these reasons:
1. Improve the clarity of the image
2. Improve its scalability
3. Reduce its memory footprint
Not all drawings are suitable for this convert. The greater the detail and complexity of the drawing,the more challenging a conversion. Simple line drawings (stencils, clipart, artistic letter characters etc.) that have good contrast are ideal candidates for the procedure below.
The Steps
Part A - with GIMP
- Open GIMP, scan the drawing as described in 'Scanning' but export the scan as a .png image (or get an computer screen capture via the MS snipping tool).
- In GIMP, open a new file via select File->New->Template->1024x768 select portrait or landscape as per the nature of the scan of the drawing.
- Drag the scan (the .png file) into the newly opened file.
- Select the scan then select the 'Scale' tool. In the Scale tool, click on the two chain parts as to join them together - this will ensure that the scan is scaled proportionately. Note: Best interpolation choice is 'Lanczos3'.
- Using one of the 'box' handles, increase the image by dragging but not too far as to cause it not to fit within the background borders.
- Anchor the newly expanded image (by activating the Rectangle Select tool and touching any where on the GIMP drawing space) and flatten the image: Image tab->Flatten Image.
- Using 'Colour' Tab->Curves, adjust the image to create good contrast and reduce greyish areas around the image.
- Using the Rectangle Select tool, select closely around the newly expanded image, crop: Image tab->Crop to Selection and finally 'export' to replace original .png image.
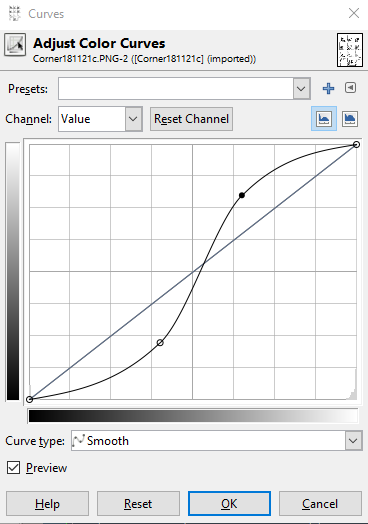
GIMP Curve: applying contrast
Part B - with Inkscape
- Open Inkscape and selecting 'Document Properties', chose portrait or landscape as per the nature of the image to be converted.
- Drag the image into Inkscape, selecting from 'Image Rendering Mode' option 'Smooth
- Select under 'Path' tab, 'Trace Bitmap' and, leaving the default options as they are, click on 'Update' then on 'Ok'
- A vector-based duplicate of the image will have been placed on top of the original. Drag it aside as to get it ready to examine it for the quality of the rendering.
- By pressing on 'Ctl' key and moving the scroll wheel, the quality of the rendering will become evident. If detail is missing, delete the rendering and redo step 3 but adjusting the 'Threshold' from 0.450 to 0.550 and re-examine. A number of trials will often get finally to a good results
- Delete the original image therein as to remain with the vector-based image.
- With the vector-based image selected, resize page to the image: 'Edit' tab->Resize Page to Selection
- Create a .png file from the newly rendered vector-based image: 'File'tab->Export PNG Image
Tip#1: In planning to create an image, the target viewers are often those using smart-phones and screens on these are often of the ratio 5.5 x 7.5 Hence an image with 550pixels x 750pixels will nicely render on such screens.
Tip#2: Related to Tip#1, wordprocessors, such as LibreOffice Writer, can have custom page formats of this ratio 5.5x7.5 thus simplify the combining images and text into a page that one can screen-capture and publish.
Tip#3: Using the steps in Part A above, one improve a screen-capture of text; that is with a good contrast and spotless image as to have 'image' text easily rendered into 'readable' characters via the freely available OCR online services, such as onlineocr.net (5 images free per day).