Scanning Photos and Documents
References:
Scanning has become a important skill for offices and essential to learn is to produce scans that are easy to read and easy to upload and download. For computer users, it is common to simply scan and send the scan by email. Often this results in a poor quality image that is very “big” in terms of memory (>1MB) which will be inconveniently slow to upload and even download for the recipient. It is recommended to do three basic actions:
1- scan the document,
2 – adjust brightness and contrast and
3 - finally scale down the image size.
The free graphic software “GIMP” is highly recommended and it is the basis for this procedure described below. The typical steps are as follows:
The Steps
- Open GIMP and place the document-to-be-scanned in the scanner (don't forget to turn it on!)
- In GIMP, select File->Create->Scanner/Camera->WIA-[Name of Scanner]
- “What do you want to scan?” dialogue box: Select “Scan” Results by default a colour image scan.
- Cropping the Scan[Optional but recommended, particularly for documents smaller than A4]: In Toolbox, select the “Rectangle Select Tool”(rectangular icon – top left-hand corner of the Toolbox. Go to top left-hand corner of the desired area to keep and drag-click to bottom right-hand corner to capture desired area. Select menu: Image->Crop to Selection
- Select menu: Colors->Curves. This opens a dialogue box with a square with a “string” running diagonally from the top right-hand corner to the bottom left-hand corner. With the cursor on the “string” approximately 2/3 down, drag- down a bit this “string”. Then at the point 2/3 up, drag-up the string. With some trials, these actions will greatly improve brightness and contrast. Press “OK” when finished.
- Select menu: Image->Scale Image. In the width box, enter, for a A4 image, a value of 800 (recommended) or 1000 (high resolution) and click on the button “Scale”. This lower of value will result in a much lower size but still very readable image.
- Select menu: File->Export. Type in a file name ending with “.jpg” (note the period “.”) such as myscan.jpg, select the folder: “My Pictures” and press “Export” to save. A quality of 85 to 90 will be sufficient. The image can now be easily attached and sent in an email.
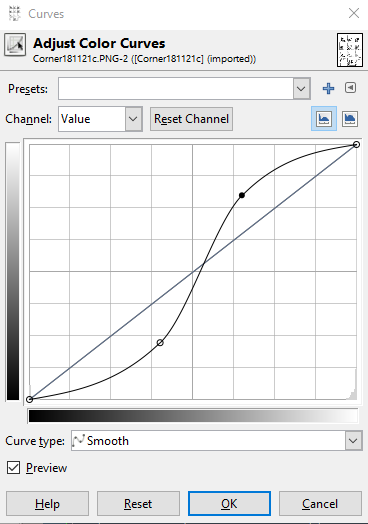
GIMP Curve: applying contrast
Note: Once the scan is brought into GIMP, there are a number of modifications that can be easily done to improve the image, under the 'Image' Tab which features 'Transform' or under the 'Tool' tab featuring several interventions for 'Transform' and others. The 'Eraser' will get rid of spots and unwanted details.
Lastly, one can chose "Grey scale" as a means to reduce further the memory size of the image and improve readability.
Lastly, one can chose "Grey scale" as a means to reduce further the memory size of the image and improve readability.